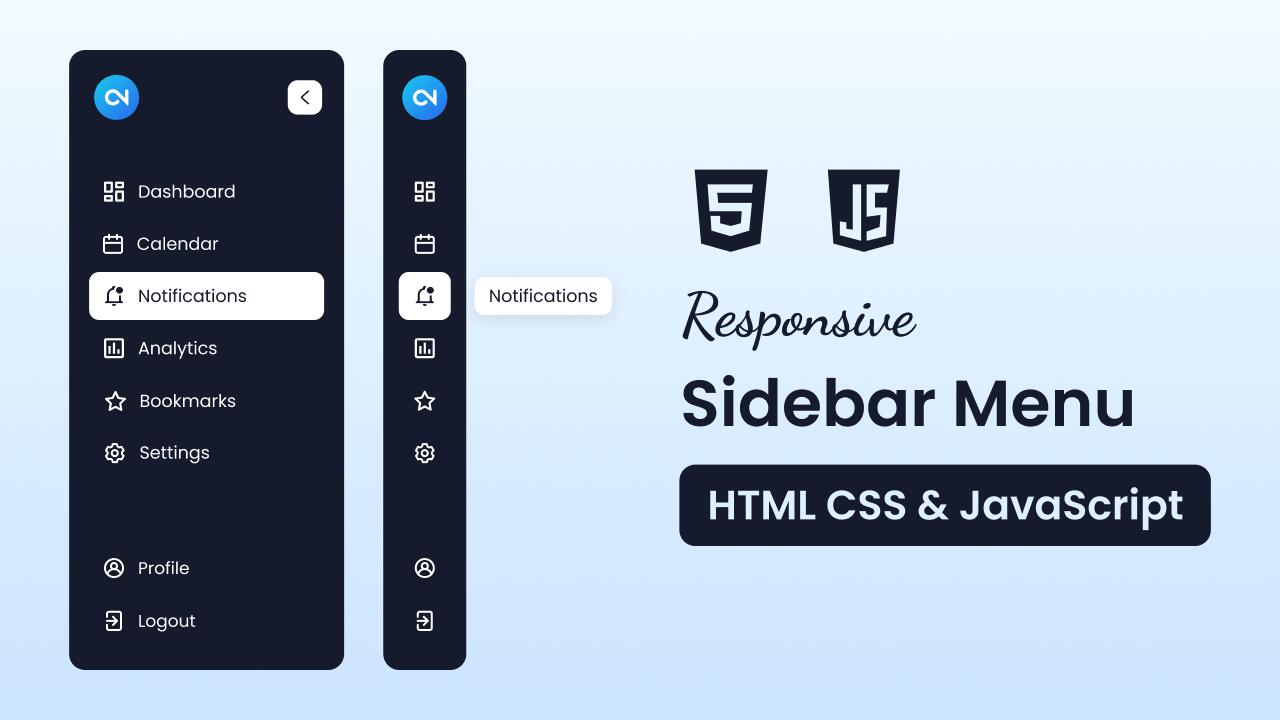
Sidebar menus are a popular feature on many websites, providing an easy way for users to navigate while keeping important links and sections just a click away. As a beginner, creating a sidebar is a great project to enhance your web development skills. You’ll learn not only how to structure and style a sidebar but also gain hands-on experience with JavaScript, making the sidebar both interactive and responsive.
In this blog post, I’ll guide you through creating an interactive sidebar menu using HTML, CSS, and JavaScript. Users can easily toggle the sidebar to collapse and expand, with cool tooltips that appear on hover. On smaller devices, the sidebar changes into a menu that slides down from the top.
By the end of this guide, you will have a sleek, modern sidebar menu that is fully functional and responsive. This sidebar can be easily integrated into your existing website projects, enhancing user navigation.
Video Tutorial of Sidebar Menu in HTML CSS & JavaScript
The YouTube tutorial above is an excellent resource if you prefer video learning. It covers every line of code in detail, with helpful comments to make the process easy to follow. For those who prefer a written guide, keep reading as we break down each step of the sidebar project.
Steps to Create Sidebar Menu HTML CSS & JavaScript
To create a responsive sidebar menu using HTML, CSS, and JavaScript, follow these simple step-by-step instructions:
- Create a folder with any name you like, e.g., sidebar-menu.
- Inside it, create the necessary files:
index.html,style.css, andscript.js. - Download the logo and place it in your project directory. Alternatively, you can use your own logo if preferred.
In your index.html file, start by setting up the basic HTML structure for the sidebar. Use semantic elements like <aside>, <header>, <ul>, <li>, and <a> to create a well-organized and accessible sidebar layout.
<!DOCTYPE html>
<!-- Coding By CodingNepal - youtube.com/@codingnepal -->
<html lang="en">
<head>
  <meta charset="UTF-8">
  <meta name="viewport" content="width=device-width, initial-scale=1.0">
  <title>Sidebar Menu | CodingNepal</title>
  <link rel="stylesheet" href="style.css">
  <!-- Linking Google fonts for icons -->
  <link rel="stylesheet" href="https://fonts.googleapis.com/css2?family=Material+Symbols+Rounded:opsz,wght,FILL,GRAD@24,400,0,0">
</head>
<body>
  <aside class="sidebar">
    <!-- Sidebar header -->
    <header class="sidebar-header">
      <a href="#" class="header-logo">
        <img src="logo.png" alt="CodingNepal">
      </a>
      <button class="toggler sidebar-toggler">
        <span class="material-symbols-rounded">chevron_left</span>
      </button>
      <button class="toggler menu-toggler">
        <span class="material-symbols-rounded">menu</span>
      </button>
    </header>

    <nav class="sidebar-nav">
      <!-- Primary top nav -->
      <ul class="nav-list primary-nav">
        <li class="nav-item">
          <a href="#" class="nav-link">
            <span class="nav-icon material-symbols-rounded">dashboard</span>
            <span class="nav-label">Dashboard</span>
          </a>
          <span class="nav-tooltip">Dashboard</span>
        </li>
        <li class="nav-item">
          <a href="#" class="nav-link">
            <span class="nav-icon material-symbols-rounded">calendar_today</span>
            <span class="nav-label">Calendar</span>
          </a>
          <span class="nav-tooltip">Calendar</span>
        </li>
        <li class="nav-item">
          <a href="#" class="nav-link">
            <span class="nav-icon material-symbols-rounded">notifications</span>
            <span class="nav-label">Notifications</span>
          </a>
          <span class="nav-tooltip">Notifications</span>
        </li>
        <li class="nav-item">
          <a href="#" class="nav-link">
            <span class="nav-icon material-symbols-rounded">group</span>
            <span class="nav-label">Team</span>
          </a>
          <span class="nav-tooltip">Team</span>
        </li>
        <li class="nav-item">
          <a href="#" class="nav-link">
            <span class="nav-icon material-symbols-rounded">insert_chart</span>
            <span class="nav-label">Analytics</span>
          </a>
          <span class="nav-tooltip">Analytics</span>
        </li>
        <li class="nav-item">
          <a href="#" class="nav-link">
            <span class="nav-icon material-symbols-rounded">star</span>
            <span class="nav-label">Bookmarks</span>
          </a>
          <span class="nav-tooltip">Bookmarks</span>
        </li>
        <li class="nav-item">
          <a href="#" class="nav-link">
            <span class="nav-icon material-symbols-rounded">settings</span>
            <span class="nav-label">Settings</span>
          </a>
          <span class="nav-tooltip">Settings</span>
        </li>
      </ul>

      <!-- Secondary bottom nav -->
      <ul class="nav-list secondary-nav">
        <li class="nav-item">
          <a href="#" class="nav-link">
            <span class="nav-icon material-symbols-rounded">account_circle</span>
            <span class="nav-label">Profile</span>
          </a>
          <span class="nav-tooltip">Profile</span>
        </li>
        <li class="nav-item">
          <a href="#" class="nav-link">
            <span class="nav-icon material-symbols-rounded">logout</span>
            <span class="nav-label">Logout</span>
          </a>
          <span class="nav-tooltip">Logout</span>
        </li>
      </ul>
    </nav>
  </aside>

  <!-- Script -->
  <script src="script.js"></script>
</body>
</html>
In your style.css file, style your sidebar to achieve a sleek, modern, and responsive design. Experiment with colors, fonts, and backgrounds to enhance the design.
/* Importing Google Fonts - Poppins */
@import url('https://fonts.googleapis.com/css2?family=Poppins:wght@400;500;600;700&display=swap');

* {
  margin: 0;
  padding: 0;
  box-sizing: border-box;
  font-family: "Poppins", sans-serif;
}

body {
  min-height: 100vh;
  background: linear-gradient(#F1FAFF, #CBE4FF);
}

.sidebar {
  position: fixed;
  width: 270px;
  margin: 16px;
  border-radius: 16px;
  background: #151A2D;
  height: calc(100vh - 32px);
  transition: all 0.4s ease;
}

.sidebar.collapsed {
  width: 85px;
}

.sidebar .sidebar-header {
  display: flex;
  position: relative;
  padding: 25px 20px;
  align-items: center;
  justify-content: space-between;
}

.sidebar-header .header-logo img {
  width: 46px;
  height: 46px;
  display: block;
  object-fit: contain;
  border-radius: 50%;
}

.sidebar-header .toggler {
  height: 35px;
  width: 35px;
  color: #151A2D;
  border: none;
  cursor: pointer;
  display: flex;
  background: #fff;
  align-items: center;
  justify-content: center;
  border-radius: 8px;
  transition: 0.4s ease;
}

.sidebar-header .sidebar-toggler {
  position: absolute;
  right: 20px;
}

.sidebar-header .menu-toggler {
  display: none;
}

.sidebar.collapsed .sidebar-header .toggler {
  transform: translate(-4px, 65px);
}

.sidebar-header .toggler:hover {
  background: #dde4fb;
}

.sidebar-header .toggler span {
  font-size: 1.75rem;
  transition: 0.4s ease;
}

.sidebar.collapsed .sidebar-header .toggler span {
  transform: rotate(180deg);
}

.sidebar-nav .nav-list {
  list-style: none;
  display: flex;
  gap: 4px;
  padding: 0 15px;
  flex-direction: column;
  transform: translateY(15px);
  transition: 0.4s ease;
}

.sidebar.collapsed .sidebar-nav .primary-nav {
  transform: translateY(65px);
}

.sidebar-nav .nav-link {
  color: #fff;
  display: flex;
  gap: 12px;
  white-space: nowrap;
  border-radius: 8px;
  padding: 12px 15px;
  align-items: center;
  text-decoration: none;
  transition: 0.4s ease;
}

.sidebar.collapsed .sidebar-nav .nav-link {
  border-radius: 12px;
}

.sidebar .sidebar-nav .nav-link .nav-label {
  transition: opacity 0.3s ease;
}

.sidebar.collapsed .sidebar-nav .nav-link .nav-label {
  opacity: 0;
  pointer-events: none;
}

.sidebar-nav .nav-link:hover {
  color: #151A2D;
  background: #fff;
}

.sidebar-nav .nav-item {
  position: relative;
}

.sidebar-nav .nav-tooltip {
  position: absolute;
  top: -10px;
  opacity: 0;
  color: #151A2D;
  display: none;
  pointer-events: none;
  padding: 6px 12px;
  border-radius: 8px;
  white-space: nowrap;
  background: #fff;
  left: calc(100% + 25px);
  box-shadow: 0 5px 10px rgba(0, 0, 0, 0.1);
  transition: 0s;
}

.sidebar.collapsed .sidebar-nav .nav-tooltip {
  display: block;
}

.sidebar-nav .nav-item:hover .nav-tooltip {
  opacity: 1;
  pointer-events: auto;
  transform: translateY(50%);
  transition: all 0.4s ease;
}

.sidebar-nav .secondary-nav {
  position: absolute;
  bottom: 30px;
  width: 100%;
}

/* Responsive media query code for small screens */
@media (max-width: 1024px) {
  .sidebar {
    height: 56px;
    margin: 13px;
    overflow-y: hidden;
    scrollbar-width: none;
    width: calc(100% - 26px);
    max-height: calc(100vh - 26px);
  }

  .sidebar.menu-active {
    overflow-y: auto;
  }

  .sidebar .sidebar-header {
    position: sticky;
    top: 0;
    z-index: 20;
    border-radius: 16px;
    background: #151A2D;
    padding: 8px 10px;
  }

  .sidebar-header .header-logo img {
    width: 40px;
    height: 40px;
  }

  .sidebar-header .sidebar-toggler,
  .sidebar-nav .nav-item:hover .nav-tooltip {
    display: none;
  }

  .sidebar-header .menu-toggler {
    display: flex;
    height: 30px;
    width: 30px;
  }

  .sidebar-header .menu-toggler span {
    font-size: 1.3rem;
  }

  .sidebar .sidebar-nav .nav-list {
    padding: 0 10px;
  }

  .sidebar-nav .nav-link {
    gap: 10px;
    padding: 10px;
    font-size: 0.94rem;
  }

  .sidebar-nav .nav-link .nav-icon {
    font-size: 1.37rem;
  }

  .sidebar-nav .secondary-nav {
    position: relative;
    bottom: 0;
    margin: 40px 0 30px;
  }
}
In your script.js file, add JavaScript to bring functionality to your sidebar. This code will make the sidebar interactive, allowing it to collapse and expand smoothly with a toggle effect.
const sidebar = document.querySelector(".sidebar");
const sidebarToggler = document.querySelector(".sidebar-toggler");
const menuToggler = document.querySelector(".menu-toggler");

// Ensure these heights match the CSS sidebar height values
let collapsedSidebarHeight = "56px"; // Height in mobile view (collapsed)
let fullSidebarHeight = "calc(100vh - 32px)"; // Height in larger screen

// Toggle sidebar's collapsed state
sidebarToggler.addEventListener("click", () => {
  sidebar.classList.toggle("collapsed");
});

// Update sidebar height and menu toggle text
const toggleMenu = (isMenuActive) => {
  sidebar.style.height = isMenuActive ? `${sidebar.scrollHeight}px` : collapsedSidebarHeight;
  menuToggler.querySelector("span").innerText = isMenuActive ? "close" : "menu";
}

// Toggle menu-active class and adjust height
menuToggler.addEventListener("click", () => {
  toggleMenu(sidebar.classList.toggle("menu-active"));
});

// (Optional code): Adjust sidebar height on window resize
window.addEventListener("resize", () => {
  if (window.innerWidth >= 1024) {
    sidebar.style.height = fullSidebarHeight;
  } else {
    sidebar.classList.remove("collapsed");
    sidebar.style.height = "auto";
    toggleMenu(sidebar.classList.contains("menu-active"));
  }
});
That’s it! If you’ve added the code correctly, you’re ready to see and interact with your sidebar menu. Open the index.html file in your preferred browser to view the project in action.
Conclusion and final word
In conclusion, creating a sidebar menu using HTML, CSS, and JavaScript is a great way to enhance your web development skills while adding a functional and stylish feature to your website. With the knowledge you’ve gained, you’re now ready to implement and customize sidebars for any site.
If you encounter any problems while creating your sidebar menu, you can download the source code files for this project for free by clicking the “Download” button. You can also view a live demo of it by clicking the “View Live” button.


