Hey dude, I believe you are doing well. As usual, today you will learn to Create A Profile Card UI Design using only HTML and CSS. I have already created many Card Designs I hope you have watched them. Today’s profile card will be simple and valuable.
Profile cards are card designs that contain important details of a specific person briefly. It could contain details like a person’s name, email, social media links for that person, and other important details. We can find this type of profile card on websites like portfolio websites and other types of websites
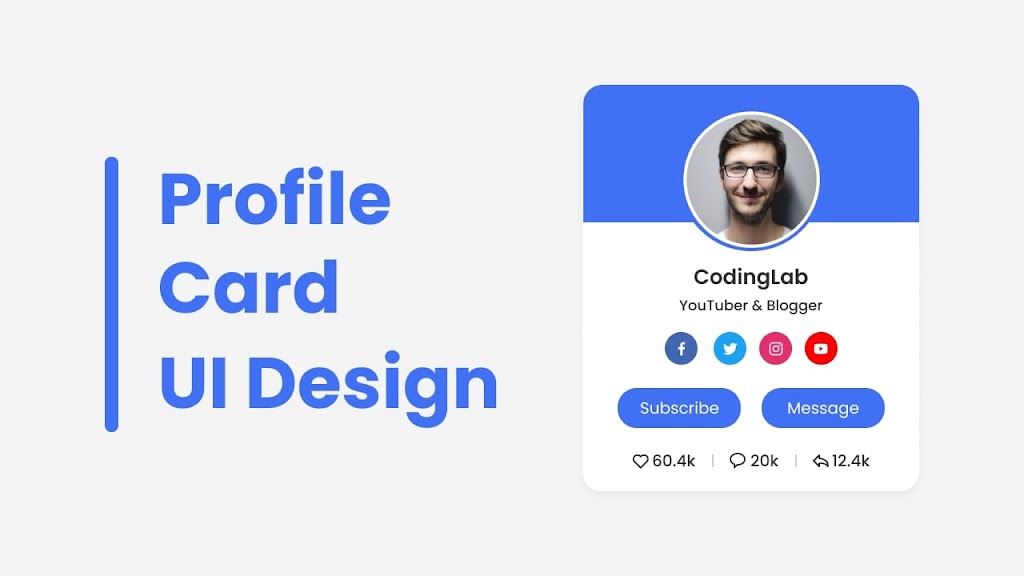
Have a quick look at the given image of our Profile Card Design. As you can see on the image there are lots of details I have added like profile image, name, social media link buttons, subscribe and message button, and the numbers of likes, comments, and shares.
You can watch the demo of this Profile Card UI Design from the video that I have provided below. Also, you can get all the ideas of HTML and CSS code that I have used to create this beautiful profile card design.
How to Create Profile Card in HTML & CSS | Video Tutorial
I have provided all the HTML and CSS code that I have used to create this Profile Card UI Design. Before getting into the source code file. I would like to explain the video tutorial on the profile card briefly.
As you have seen in the video tutorial on the Profile Card UI Design. There was an image with a beautiful border, some buttons, and social media links. To create this profile card I used only HTML and CSS. As you have seen I have created this profile card from scratch.
I hope, now you can make this profile card using HTML and CSS. If you are having difficulty creating this profile card, I have provided all the source codes below, from there you can copy or download all the source code files of this beautiful profile card.
You May Like This:
Profile Card UI Design [Source Code]
<!DOCTYPE html>
<html lang="en">
  <head>
    <meta charset="UTF-8" />
    <meta name="viewport" content="width=device-width, initial-scale=1.0" />
    <title>Profile Card UI Design</title>
    <!-- CSS -->
    <link rel="stylesheet" href="style.css" />
    <!-- Boxicons CSS -->
    <link href="https://unpkg.com/[email protected]/css/boxicons.min.css" rel="stylesheet" />
  </head>
  <body>
    <div class="profile-card">
      <div class="image">
        <img src="profile.jpg" alt="" class="profile-img" />
      </div>

      <div class="text-data">
        <span class="name">CodingLab</span>
        <span class="job">YouTuber & Blogger</span>
      </div>

      <div class="media-buttons">
        <a href="#" style="background: #4267b2" class="link">
          <i class="bx bxl-facebook"></i>
        </a>
        <a href="#" style="background: #1da1f2" class="link">
          <i class="bx bxl-twitter"></i>
        </a>
        <a href="#" style="background: #e1306c" class="link">
          <i class="bx bxl-instagram"></i>
        </a>
        <a href="#" style="background: #ff0000" class="link">
          <i class="bx bxl-youtube"></i>
        </a>
      </div>

      <div class="buttons">
        <button class="button">Subscribe</button>
        <button class="button">Message</button>
      </div>

      <div class="analytics">
        <div class="data">
          <i class="bx bx-heart"></i>
          <span class="number">60k</span>
        </div>
        <div class="data">
          <i class="bx bx-message-rounded"></i>
          <span class="number">20k</span>
        </div>
        <div class="data">
          <i class="bx bx-share"></i>
          <span class="number">12k</span>
        </div>
      </div>
    </div>
  </body>
</html>
/* Google Fonts - Poppins */
@import url("https://fonts.googleapis.com/css2?family=Poppins:wght@300;400;500;600&display=swap");

* {
  margin: 0;
  padding: 0;
  box-sizing: border-box;
  font-family: "Poppins", sans-serif;
}

body {
  height: 100vh;
  display: flex;
  align-items: center;
  justify-content: center;
  background-color: #f4f4f4;
}

.profile-card {
  display: flex;
  flex-direction: column;
  align-items: center;
  max-width: 370px;
  width: 100%;
  background: #fff;
  border-radius: 24px;
  padding: 25px;
  box-shadow: 0 5px 10px rgba(0, 0, 0, 0.1);
  position: relative;
}

.profile-card::before {
  content: "";
  position: absolute;
  top: 0;
  left: 0;
  height: 36%;
  width: 100%;
  border-radius: 24px 24px 0 0;
  background-color: #4070f4;
}

.image {
  position: relative;
  height: 150px;
  width: 150px;
  border-radius: 50%;
  background-color: #4070f4;
  padding: 3px;
  margin-bottom: 10px;
}

.image .profile-img {
  height: 100%;
  width: 100%;
  object-fit: cover;
  border-radius: 50%;
  border: 3px solid #fff;
}

.profile-card .text-data {
  display: flex;
  flex-direction: column;
  align-items: center;
  color: #333;
}

.text-data .name {
  font-size: 22px;
  font-weight: 500;
}

.text-data .job {
  font-size: 15px;
  font-weight: 400;
}

.profile-card .media-buttons {
  display: flex;
  align-items: center;
  margin-top: 15px;
}

.media-buttons .link {
  display: flex;
  align-items: center;
  justify-content: center;
  color: #fff;
  font-size: 18px;
  height: 34px;
  width: 34px;
  border-radius: 50%;
  margin: 0 8px;
  background-color: #4070f4;
  text-decoration: none;
}

.profile-card .buttons {
  display: flex;
  align-items: center;
  margin-top: 25px;
}

.buttons .button {
  color: #fff;
  font-size: 14px;
  font-weight: 400;
  border: none;
  border-radius: 24px;
  margin: 0 10px;
  padding: 8px 24px;
  background-color: #4070f4;
  cursor: pointer;
  transition: all 0.3s ease;
}

.buttons .button:hover {
  background-color: #0e4bf1;
}

.profile-card .analytics {
  display: flex;
  align-items: center;
  margin-top: 25px;
}

.analytics .data {
  display: flex;
  align-items: center;
  color: #333;
  padding: 0 20px;
  border-right: 2px solid #e7e7e7;
}

.data i {
  font-size: 18px;
  margin-right: 6px;
}

.data:last-child {
  border-right: none;
}


