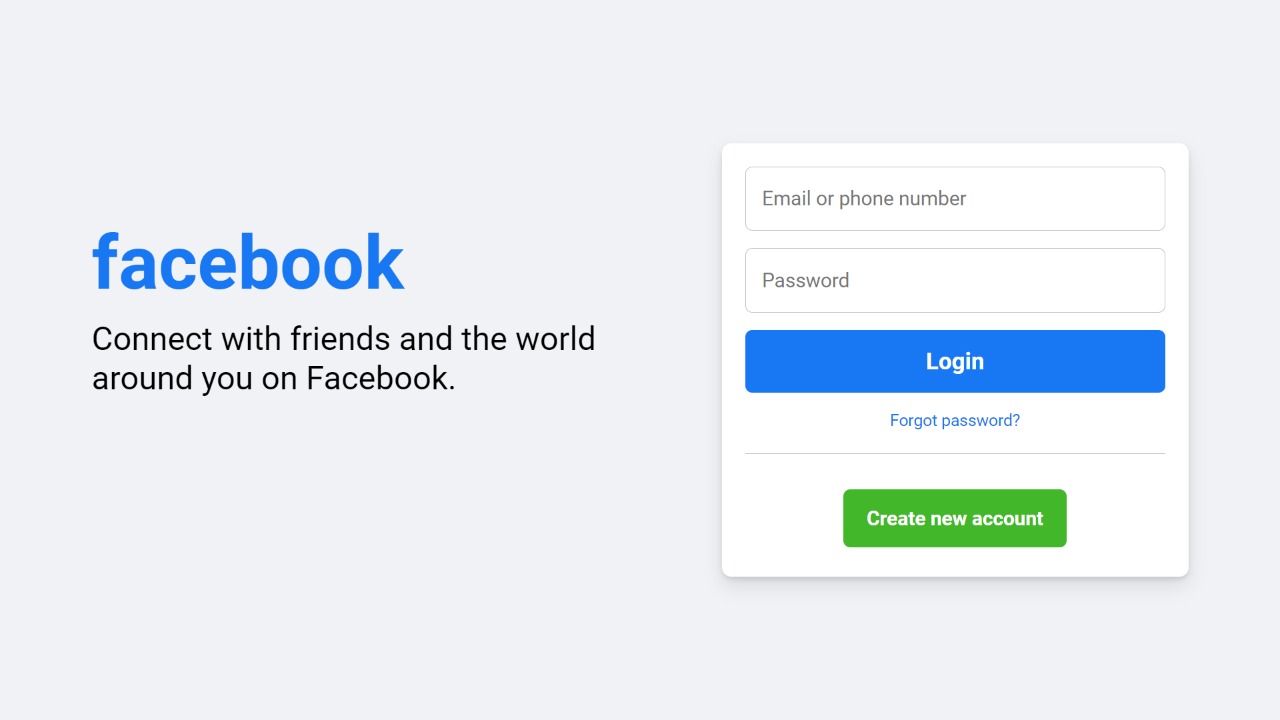
Creating a Facebook login page can be an exciting and practical project for beginner web developers because Facebook is a widely used social media platform. By recreating its login page, you can learn valuable skills in designing user interfaces that people are already familiar with.
In this blog post, I’ll guide you through how to create a responsive Facebook login page using only HTML and CSS. This project is beginner-friendly, allowing you to gain hands-on experience with these essential languages and styles.
Throughout the process, we’ll explore different HTML tags, such as headers, forms, inputs, and links. We’ll also dive into CSS properties to style our login form, including color, background, and font choice, and make it responsive for all devices.
Video Tutorial of Facebook Login Page HTML & CSS
Steps To Create Facebook Login Page HTML & CSS
To create a Facebook login page using HTML and CSS, follow these step-by-step instructions:
- Create a folder. You can name this folder whatever you want, and inside this folder, create the mentioned files.
- Create an
index.htmlfile. The file name must be index and its extension .html - Create a
style.cssfile. The file name must be style and its extension .css
To start, add the following HTML codes to your index.html file: This code includes various elements such as a header for the login page, paragraphs, a form, input fields, a button, and links. I’ve also included default form validation by using the required attribute.
<!DOCTYPE html>
<!-- Coding By CodingNepal - www.codingnepalweb.com -->
<html lang="en">
  <head>
    <meta charset="UTF-8">
    <meta name="viewport" content="width=device-width, initial-scale=1.0">
    <title>Facebook Login Page | CodingNepal</title>
    <link rel="stylesheet" href="style.css">
  </head>
  <body>
    <div class="container flex">
      <div class="facebook-page flex">
        <div class="text">
          <h1>facebook</h1>
          <p>Connect with friends and the world </p>
          <p> around you on Facebook.</p>
        </div>
        <form action="#">
          <input type="email" placeholder="Email or phone number" required>
          <input type="password" placeholder="Password" required>
          <div class="link">
            <button type="submit" class="login">Login</button>
            <a href="#" class="forgot">Forgot password?</a>
          </div>
          <hr>
          <div class="button">
            <a href="#">Create new account</a>
          </div>
        </form>
      </div>
    </div>
  </body>
</html>
Next, add the following CSS codes to your style.css file to make it look like the Facebook login page. This code includes different styles for elements such as color, background, and border. Feel free to customize these styles according to your preferences.
@import url('https://fonts.googleapis.com/css2?family=Roboto:wght@300;400;500;700&display=swap');

* {
  margin: 0;
  padding: 0;
  box-sizing: border-box;
  font-family: 'Roboto', sans-serif;
}

.flex {
  display: flex;
  align-items: center;
}

.container {
  padding: 0 15px;
  min-height: 100vh;
  justify-content: center;
  background: #f0f2f5;
}

.facebook-page {
  justify-content: space-between;
  max-width: 1000px;
  width: 100%;
}

.facebook-page .text {
  margin-bottom: 90px;
}

.facebook-page h1 {
  color: #1877f2;
  font-size: 4rem;
  margin-bottom: 10px;
}

.facebook-page p {
  font-size: 1.75rem;
  white-space: nowrap;
}

form {
  display: flex;
  flex-direction: column;
  background: #fff;
  border-radius: 8px;
  padding: 20px;
  box-shadow: 0 2px 4px rgba(0, 0, 0, 0.1),
    0 8px 16px rgba(0, 0, 0, 0.1);
  max-width: 400px;
  width: 100%;
}

form input {
  height: 55px;
  width: 100%;
  border: 1px solid #ccc;
  border-radius: 6px;
  margin-bottom: 15px;
  font-size: 1rem;
  padding: 0 14px;
}

form input:focus {
  outline: none;
  border-color: #1877f2;
}

::placeholder {
  color: #777;
  font-size: 1.063rem;
}

.link {
  display: flex;
  flex-direction: column;
  text-align: center;
  gap: 15px;
}

.link .login {
  border: none;
  outline: none;
  cursor: pointer;
  background: #1877f2;
  padding: 15px 0;
  border-radius: 6px;
  color: #fff;
  font-size: 1.25rem;
  font-weight: 600;
  transition: 0.2s ease;
}

.link .login:hover {
  background: #0d65d9;
}

form a {
  text-decoration: none;
}

.link .forgot {
  color: #1877f2;
  font-size: 0.875rem;
}

.link .forgot:hover {
  text-decoration: underline;
}

hr {
  border: none;
  height: 1px;
  background-color: #ccc;
  margin-bottom: 20px;
  margin-top: 20px;
}

.button {
  margin-top: 25px;
  text-align: center;
  margin-bottom: 20px;
}

.button a {
  padding: 15px 20px;
  background: #42b72a;
  border-radius: 6px;
  color: #fff;
  font-size: 1.063rem;
  font-weight: 600;
  transition: 0.2s ease;
}

.button a:hover {
  background: #3ba626;
}

@media (max-width: 900px) {
  .facebook-page {
    flex-direction: column;
    text-align: center;
  }

  .facebook-page .text {
    margin-bottom: 30px;
  }
}

@media (max-width: 460px) {
  .facebook-page h1 {
    font-size: 3.5rem;
  }

  .facebook-page p {
    font-size: 1.3rem;
  }

  form {
    padding: 15px;
  }
}
Conclusion and Final Words
In conclusion, creating a Facebook login page can be a helpful project for those who are new to web development. I hope that by following the steps outlined in this post, you’re able to create a responsive Facebook login page using HTML and CSS.
If you want to further enhance your skills, you can explore other beginner-friendly login form designs available on this website. These forms are great practice opportunities to improve your skills in HTML and CSS.
If you encounter any problems while creating your Facebook login page, you can download the source code files for this Facebook login page project for free by clicking the Download button. You can also view a live demo of it by clicking the View Live button.


give me codes
Do you have for the mobile version?
Give me all the codes
please give me all the code
You can copy or download source codes from the above post.