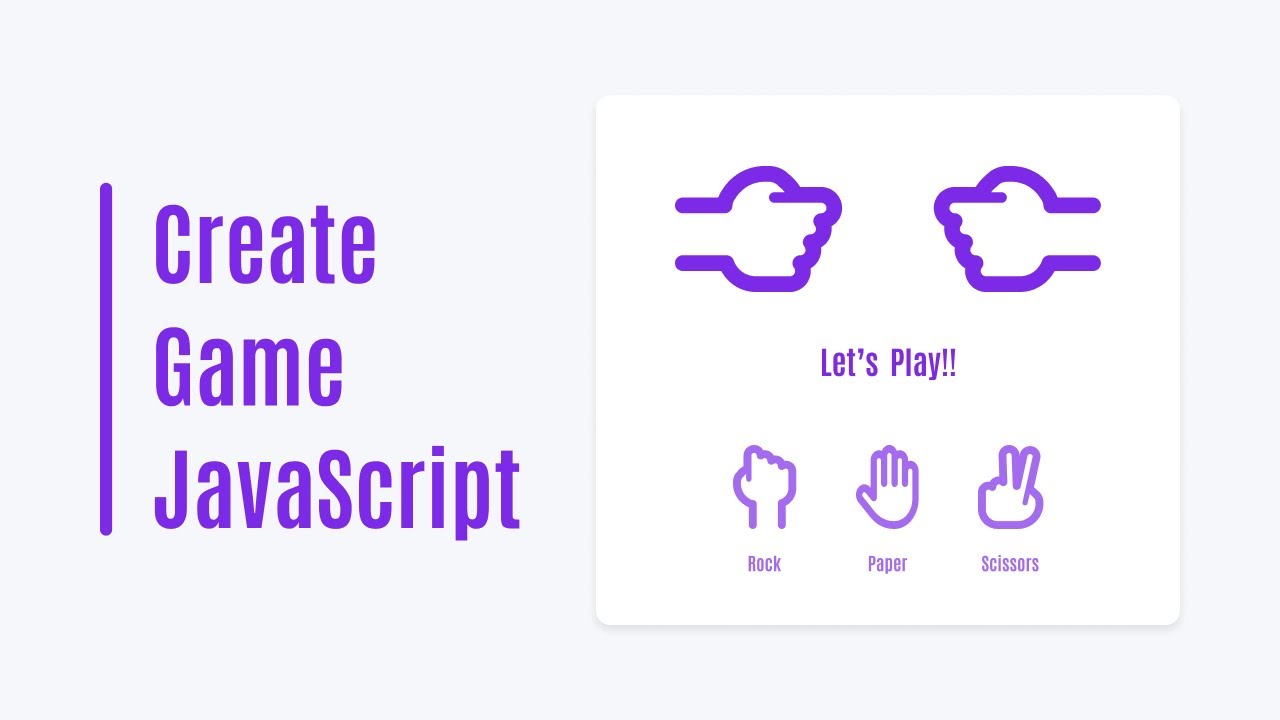
Rock-Paper-Scissors is a classic game that we’ve all played at some point. But have you ever thought about building it from scratch using web technologies? In this guide, I’ll walk you through the process of creating your very own Rock-Paper-Scissors game using HTML, CSS, and JavaScript.
You don’t need to be a JavaScript expert to follow along, even beginners can build this simple and fun project. By the end, you’ll understand the game logic, DOM manipulation, basic animations, and how to handle user interactions.
Recently, I also shared a tutorial on a Number Guessing Game. If you’re exploring beginner-friendly JavaScript projects, that’s another great one to check out after this!
What You’ll Be Building
In this project, the player competes against a bot opponent. The interface is clean, responsive, and includes subtle animations that make the experience feel more engaging. It’s a browser-based version of Rock-Paper-Scissors with clickable options, visual feedback, and dynamic result display.
Once complete, the game will let you:
- Choose between rock, paper, or scissors
- See the Bot’s random choice
- Display the result (win, lose, or draw)
- Watch the Bot and user hands animate before revealing their choices
Video Tutorial of Rock Paper Scissors in JavaScript
To make things easier, I’ve also recorded a step-by-step video tutorial showing exactly how I built this game from scratch. You’ll see how each line of code works, especially the logic inside the JavaScript file.
Tip: I recommend watching the full video if you’re a beginner. I’ve included helpful comments and explanations so you can code with confidence.
If you’re curious to experience a real-money twist on this classic game, you can check out the Rock Paper Scissors Game.
Disclaimer: This is a paid placement. The link above leads to a real-money gambling site intended for users aged 18 and over. Please ensure online gambling is legal in your region. Gamble responsibly.
Steps for creating a Rock-Paper-Scissors Game
To get started, create a new project folder and add the following files:
- Create Your Project Folder: Start by creating a new folder for your project. Name it something like rock-paper-scissors.
- Set Up Your Files: Inside the folder, create three files:
index.html,style.css, andscript.js. - Add Images: Download the Images folder and place it in your project directory. This folder contains all the images needed for the game.
First, paste the code into your index.html file. This sets up the basic structure of your rock-paper-scissors game, including the layout for the buttons, images, and result display. It also links your CSS and JavaScript files, making sure everything works together.
<!DOCTYPE html>
<html lang="en">
<head>
  <meta charset="UTF-8" />
  <meta http-equiv="X-UA-Compatible" content="IE=edge" />
  <meta name="viewport" content="width=device-width, initial-scale=1.0" />
  <title>Rock Paper Scissors</title>
  <link rel="stylesheet" href="style.css" />
</head>
<body>
  <section class="container">
    <!-- Result display section -->
    <div class="result_field">
        <!-- Container for user and BOT result images -->
        <div class="result_images">
            <span class="user_result">
                <img src="images/rock.png" alt="User's choice image" />
            </span>
            <span class="bot_result">
                <img src="images/rock.png" alt="BOT's choice image" />
            </span>
        </div>
        <!-- Display the game result message -->
        <div class="result">Let's Play!</div>
    </div>

    <!-- Options for user to choose from -->
    <div class="option_images">
        <span class="option_image">
            <img src="images/rock.png" alt="Rock image" />
            <p>Rock</p>
        </span>
        <span class="option_image">
            <img src="images/paper.png" alt="Paper image" />
            <p>Paper</p>
        </span>
        <span class="option_image">
            <img src="images/scissors.png" alt="Scissors image" />
            <p>Scissors</p>
        </span>
    </div>
</section>

  <script src="script.js" defer></script>
</body>
</html>
Next, add the CSS code into your style.css file. This controls how the game looks — from colors and fonts to animations. Without it, your game would look plain and unstyled. CSS makes your game visually appealing and responsive.
/* Import Google font - Audiowide */
@import url('https://fonts.googleapis.com/css2?family=Audiowide&display=swap');

* {
  margin: 0;
  padding: 0;
  box-sizing: border-box;
  font-family: "Audiowide", sans-serif;
}

body {
  height: 100vh;
  display: flex;
  padding: 15px;
  align-items: center;
  justify-content: center;
  background: #f6f7fb;
}

.container {
  display: flex;
  flex-direction: column;
  max-width: 535px;
  width: 100%;
  padding: 2rem 5rem;
  border-radius: 14px;
  background: #fff;
  box-shadow: 0 5px 10px rgba(0, 0, 0, 0.1);
}

.result_images {
  display: flex;
  gap: 7rem;
  justify-content: center;
}

.container.start .user_result {
  transform-origin: left;
  animation: userShake 0.7s ease infinite;
}

@keyframes userShake {
  50% {
    transform: rotate(10deg);
  }
}

.container.start .bot_result {
  transform-origin: right;
  animation: botShake 0.7s ease infinite;
}

@keyframes botShake {
  50% {
    transform: rotate(-10deg);
  }
}

.result_images img {
  width: 100px;
}

.user_result img {
  transform: rotate(90deg);
}

.bot_result img {
  transform: rotate(-90deg) rotateY(180deg);
}

.result {
  text-align: center;
  font-size: 2rem;
  color: #7d2ae8;
  margin: 1.5rem 0;
}

.option_image img {
  width: 50px;
}

.option_images {
  display: flex;
  width: 100%;
  align-items: center;
  margin-top: 2.5rem;
  justify-content: space-evenly;
}

.container.start .option_images {
  pointer-events: none;
}

.option_image {
  display: flex;
  flex-direction: column;
  align-items: center;
  opacity: 0.5;
  cursor: pointer;
  transition: opacity 0.3s ease;
}

.option_image:hover {
  opacity: 1;
}

.option_image.active {
  opacity: 1;
}

.option_image img {
  pointer-events: none;
}

.option_image p {
  color: #7d2ae8;
  font-size: 1.235rem;
  margin-top: 1rem;
  pointer-events: none;
}

/* Responsive media query code for small devices */
@media (max-width: 768px) {
  .container {
    padding: 2rem;
  }

  .result_images img {
    width: 80px;
  }
}

/* Responsive media query code for small devices */
@media (max-width: 500px) {
  .option_images {
    justify-content: space-between;
  }

  .option_image img {
    width: 40px;
  }
}
Finally, paste the JavaScript code into your script.js file. This handles the game’s logic, like what happens when you click a choice and how the result is determined. It makes the game interactive and fun to play.
// Get DOM elements
const gameContainer = document.querySelector(".container");
const userResult = document.querySelector(".user_result img");
const botResult = document.querySelector(".bot_result img");
const result = document.querySelector(".result");
const optionImages = document.querySelectorAll(".option_image");

// Define possible images and outcomes
const botImages = ["images/rock.png", "images/paper.png", "images/scissors.png"];
const outcomes = {
  RR: "Draw",
  RP: "BOT",
  RS: "YOU",
  PP: "Draw",
  PR: "YOU",
  PS: "BOT",
  SS: "Draw",
  SR: "BOT",
  SP: "YOU"
};

// Event handler for image click
function handleOptionClick(event) {
  const clickedImage = event.currentTarget;
  const clickedIndex = Array.from(optionImages).indexOf(clickedImage);

  // Reset results and display "Wait..."
  userResult.src = botResult.src = "images/rock.png";
  result.textContent = "Wait...";

  // Activate clicked image and deactivate others
  optionImages.forEach((image, index) => {
    image.classList.toggle("active", index === clickedIndex);
  });

  gameContainer.classList.add("start");

  setTimeout(() => {
    gameContainer.classList.remove("start");

    // Set user and bot images
    const userImageSrc = clickedImage.querySelector("img").src;
    userResult.src = userImageSrc;

    const randomNumber = Math.floor(Math.random() * botImages.length);
    const botImageSrc = botImages[randomNumber];
    botResult.src = botImageSrc;

    // Determine the result
    const userValue = ["R", "P", "S"][clickedIndex];
    const botValue = ["R", "P", "S"][randomNumber];
    const outcomeKey = userValue + botValue;
    const outcome = outcomes[outcomeKey] || "Unknown";

    // Display the result
    result.textContent = userValue === botValue ? "Match Draw" : `${outcome} WON!`;
  }, 2500);
}

// Attach event listeners to option images
optionImages.forEach(image => {
  image.addEventListener("click", handleOptionClick);
});
Troubleshooting
If you run into any issues while building the game, maybe the results aren’t displaying, or the animations don’t trigger. Don’t worry! It’s usually something small, like a typo or a missing class name.
Feel free to download the full source code and compare it with yours. This can help you spot where something might’ve gone wrong.


Please can you help me create a short video sharing website like tiktok
Take his example from YouTube and replace the video links with yours.