 Hello readers, Today in this blog you’ll learn how to create Product Cards with Fly to Cart Effect using HTML CSS & jQuery. Earlier I’ve also shared a blog on Creative Product Card Animation using HTML CSS & JavaScript and now it’s time to create fly to cart effect.
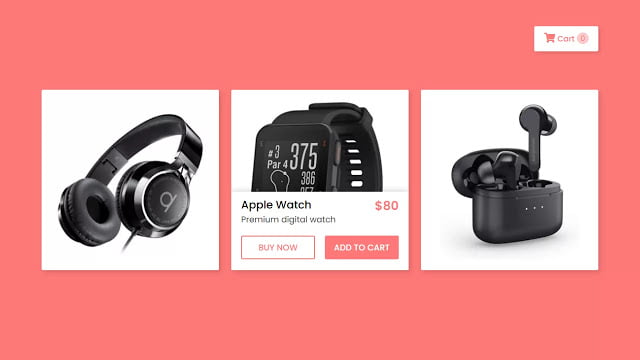
A product card is used to display a picture and details of an item or product that is linked in some way to similar items. In this program [Product Cards with Fly to Cart Effect], at first, on the webpage, there are three product images and a cart box with an icon. When you hover on a particular image then there is shown a details box with a sliding animation. In this box, there is a name, price, and buttons “to buy” and “add to cart” of product.
When you click on the particular card button, the product image of that card will duplicate or clone and move to the cart box with animation then invisible. If you’re feeling difficult to understand what I am saying. You can watch a full video tutorial on this program [Shopping Cards with Fly to Cart Effect].
Video Tutorial of Product Cards with Fly to Cart Effect
In the video, you have seen the Fly Cart Effect of a Product Card or Shopping Card. In the video, I’ve only shown the HTML & CSS part of this program. But don’t worry, I have provided the source codes of jQuery in the description of this video. This program is only possible with jQuery and jQuery UI so don’t forget to add the js file.
You might like this:
Shopping Cards with Fly to Cart Effect [Source Codes]
To create this program (Shopping Cards with Fly to Cart Effect). First, you need to create three Files one HTML File, CSS File, and JavaScript or jQuery File. After creating these files just paste the following codes into your file.
First, create an HTML file with the name of index.html and paste the given codes in your HTML file. Remember, you’ve to create a file with .html extension and the images that are used on these cards won’t appear. You’ve to download files from the given download button to use images also.
<!DOCTYPE html>
<!-- Created By CodingNepal - www.codingnepalweb.com -->
<html lang="en" dir="ltr">
  <head>
    <meta charset="utf-8">
    <title>Product Card with Fly Cart Animation | CodingNepal</title>
    <link rel="stylesheet" href="style.css">
    <link rel="stylesheet" href="https://cdnjs.cloudflare.com/ajax/libs/font-awesome/5.15.3/css/all.min.css"/>
    <script src="https://code.jquery.com/jquery-3.5.1.min.js"></script>
    <script src="https://code.jquery.com/ui/1.12.1/jquery-ui.js"></script>
  </head>
  <body>
    <div class="wrapper">
      <div class="cart-nav">
        <div class="icon">
          <i class="fas fa-shopping-cart"></i>
          <span>Cart</span>
        </div>
        <div class="item-count">0</div>
      </div>
      <div class="card">
        <img src="images/headphone.png" alt="">
        <div class="content">
          <div class="row">
            <div class="details">
              <span>Headphone</span>
              <p>Premium headphone</p>
            </div>
            <div class="price">$30</div>
          </div>
          <div class="buttons">
            <button>Buy Now</button>
            <button class="cart-btn">Add to Cart</button>
          </div>
        </div>
      </div>
      <div class="card">
        <img src="images/watch.png" alt="">
        <div class="content">
          <div class="row">
            <div class="details">
              <span>Apple Watch</span>
              <p>Premium digital watch</p>
            </div>
            <div class="price">$80</div>
          </div>
          <div class="buttons">
            <button>Buy Now</button>
            <button class="cart-btn">Add to Cart</button>
          </div>
        </div>
      </div>
      <div class="card">
        <img src="images/airpods.png" alt="">
        <div class="content">
          <div class="row">
            <div class="details">
              <span>Apple Airpod</span>
              <p>Premium black airpod</p>
            </div>
            <div class="price">$50</div>
          </div>
          <div class="buttons">
            <button>Buy Now</button>
            <button class="cart-btn">Add to Cart</button>
          </div>
        </div>
      </div>
    </div>

    <script src="script.js"></script>

  </body>
</html>
Second, create a CSS file with the name of style.css and paste the given codes in your CSS file. Remember, you’ve to create a file with .css extension.
@import url('https://fonts.googleapis.com/css2?family=Poppins:wght@200;300;400;500;600;700&display=swap');
*{
  margin: 0;
  padding: 0;
  box-sizing: border-box;
  font-family: 'Poppins', sans-serif;
}
::selection{
  color: #fff;
  background: #ff7979;
}
body{
  display: flex;
  align-items: center;
  justify-content: center;
  min-height: 100vh;
  background: #ff7979;
  padding: 0 20px;
}
.wrapper{
  position: relative;
  max-width: 1130px;
  display: flex;
  align-items: center;
  justify-content: space-between;
}
.wrapper .cart-nav{
  position: absolute;
  right: 0;
  top: -35%;
  width: 130px;
  background: #fff;
  padding: 13px 15px;
  border-radius: 3px;
  display: flex;
  cursor: pointer;
  justify-content: space-evenly;
  box-shadow: 3px 3px 8px 0px rgba(0,0,0,0.15);
}
.cart-nav .icon{
  color: #ff7979;
}
.cart-nav .icon i{
  font-size: 20px;
}
.cart-nav .icon span{
  font-weight: 500;
}
.cart-nav .item-count{
  font-size: 15px;
  height: 23px;
  width: 23px;
  color: #ff7979;
  background: #ffcccc;
  text-align: center;
  line-height: 22px;
  border: 1px solid #ffb3b3;
  border-radius: 50%;
}
.wrapper .card{
  position: relative;
  background: #fff;
  border-radius: 3px;
  width: calc(33% - 13px);
  overflow: hidden;
  box-shadow: 4px 4px 10px 0px rgba(0,0,0,0.15);
}
.wrapper .card img{
  width: 100%;
  border-radius: 3px;
  transition: all 0.3s ease;
}
.card:hover img{
  transform: scale(1.1);
}
.wrapper .card .content{
  position: absolute;
  width: 100%;
  bottom: -50%;
  background: #fff;
  padding: 10px 20px 22px 20px;
  box-shadow: 0px -3px 10px 0px rgba(0,0,0,0.15);
  transition: all 0.3s ease;
}
.wrapper .card:hover .content{
  bottom: 0;
}
.card .content .row,
.content .buttons{
  display: flex;
  justify-content: space-between;
}
.content .row .details span{
  font-size: 22px;
  font-weight: 500;
}
.content .row .details p{
  color: #333;
  font-size: 17px;
  font-weight: 400;
}
.content .row .price{
  color: #ff7979;
  font-size: 25px;
  font-weight: 600;
}
.content .buttons{
  margin-top: 20px;
}
.content .buttons button{
  width: 100%;
  padding: 9px 0;
  outline: none;
  cursor: pointer;
  font-size: 17px;
  font-weight: 500;
  border-radius: 3px;
  border: 2px solid #ff7979;
  text-transform: uppercase;
  transition: all 0.3s ease;
}
.buttons button:first-child{
  color: #ff7979;
  margin-right: 10px;
  background: #fff;
}
button:first-child:hover{
  color: #fff;
  background: #ff7979;
}
.buttons button:last-child{
  color: #fff;
  margin-left: 10px;
  background: #ff7979;
}
button:last-child:hover{
  background: #ff6666;
  border-color: #ff6666;
}
Last, create a JavaScript file with the name of script.js and paste the given codes in your JavaScript file. Remember, you’ve to create a file with .js extension.
let count = 0;
//if add to cart btn clicked
$('.cart-btn').on('click', function (){
  let cart = $('.cart-nav');
  // find the img of that card which button is clicked by user
  let imgtodrag = $(this).parent('.buttons').parent('.content').parent('.card').find("img").eq(0);
  if (imgtodrag) {
    // duplicate the img
    var imgclone = imgtodrag.clone().offset({
      top: imgtodrag.offset().top,
      left: imgtodrag.offset().left
    }).css({
      'opacity': '0.8',
      'position': 'absolute',
      'height': '150px',
      'width': '150px',
      'z-index': '100'
    }).appendTo($('body')).animate({
      'top': cart.offset().top + 20,
      'left': cart.offset().left + 30,
      'width': 75,
      'height': 75
    }, 1000, 'easeInOutExpo');

    setTimeout(function(){
      count++;
      $(".cart-nav .item-count").text(count);
    }, 1500);

    imgclone.animate({
      'width': 0,
      'height': 0
    }, function(){
      $(this).detach()
    });
  }
});
That’s all, now you’ve successfully created a Product Card with Fly to Cart Effect using HTML CSS & jQuery. If your code not work or you’ve faced any errors/problems then please download the source code files from the given download button. It’s free and a .zip file will be downloaded and you’ve extracted it.


hey, am looking for a teacher, can you be my tutor, i love your work.
Thanks for loving my work. I’m always your tutor, just don’t stop watching my videos.
can you make template for ecommerce webpage
Ok.. I'll think about it
can you please make a working cheukout form that withdraws money